In its simplest form, react-denmark-map is a library that enables React developers to display an SVG of Denmark. It has a bunch of features on top of just displaying a SVG which is what makes it special.
Without going into too much detail, the benefits of using react-denmark-map as opposed to making your own SVG is that it allows developers to:
- not make their own SVG of Denmark (which is typically a lot of work).
- programmatically customize the map so that you don't have to manually create the relevant SVG's. This also enables using data from a web API where the data is not static.
- pick between outlining municipalities, regions, islands or a full map of Denmark.
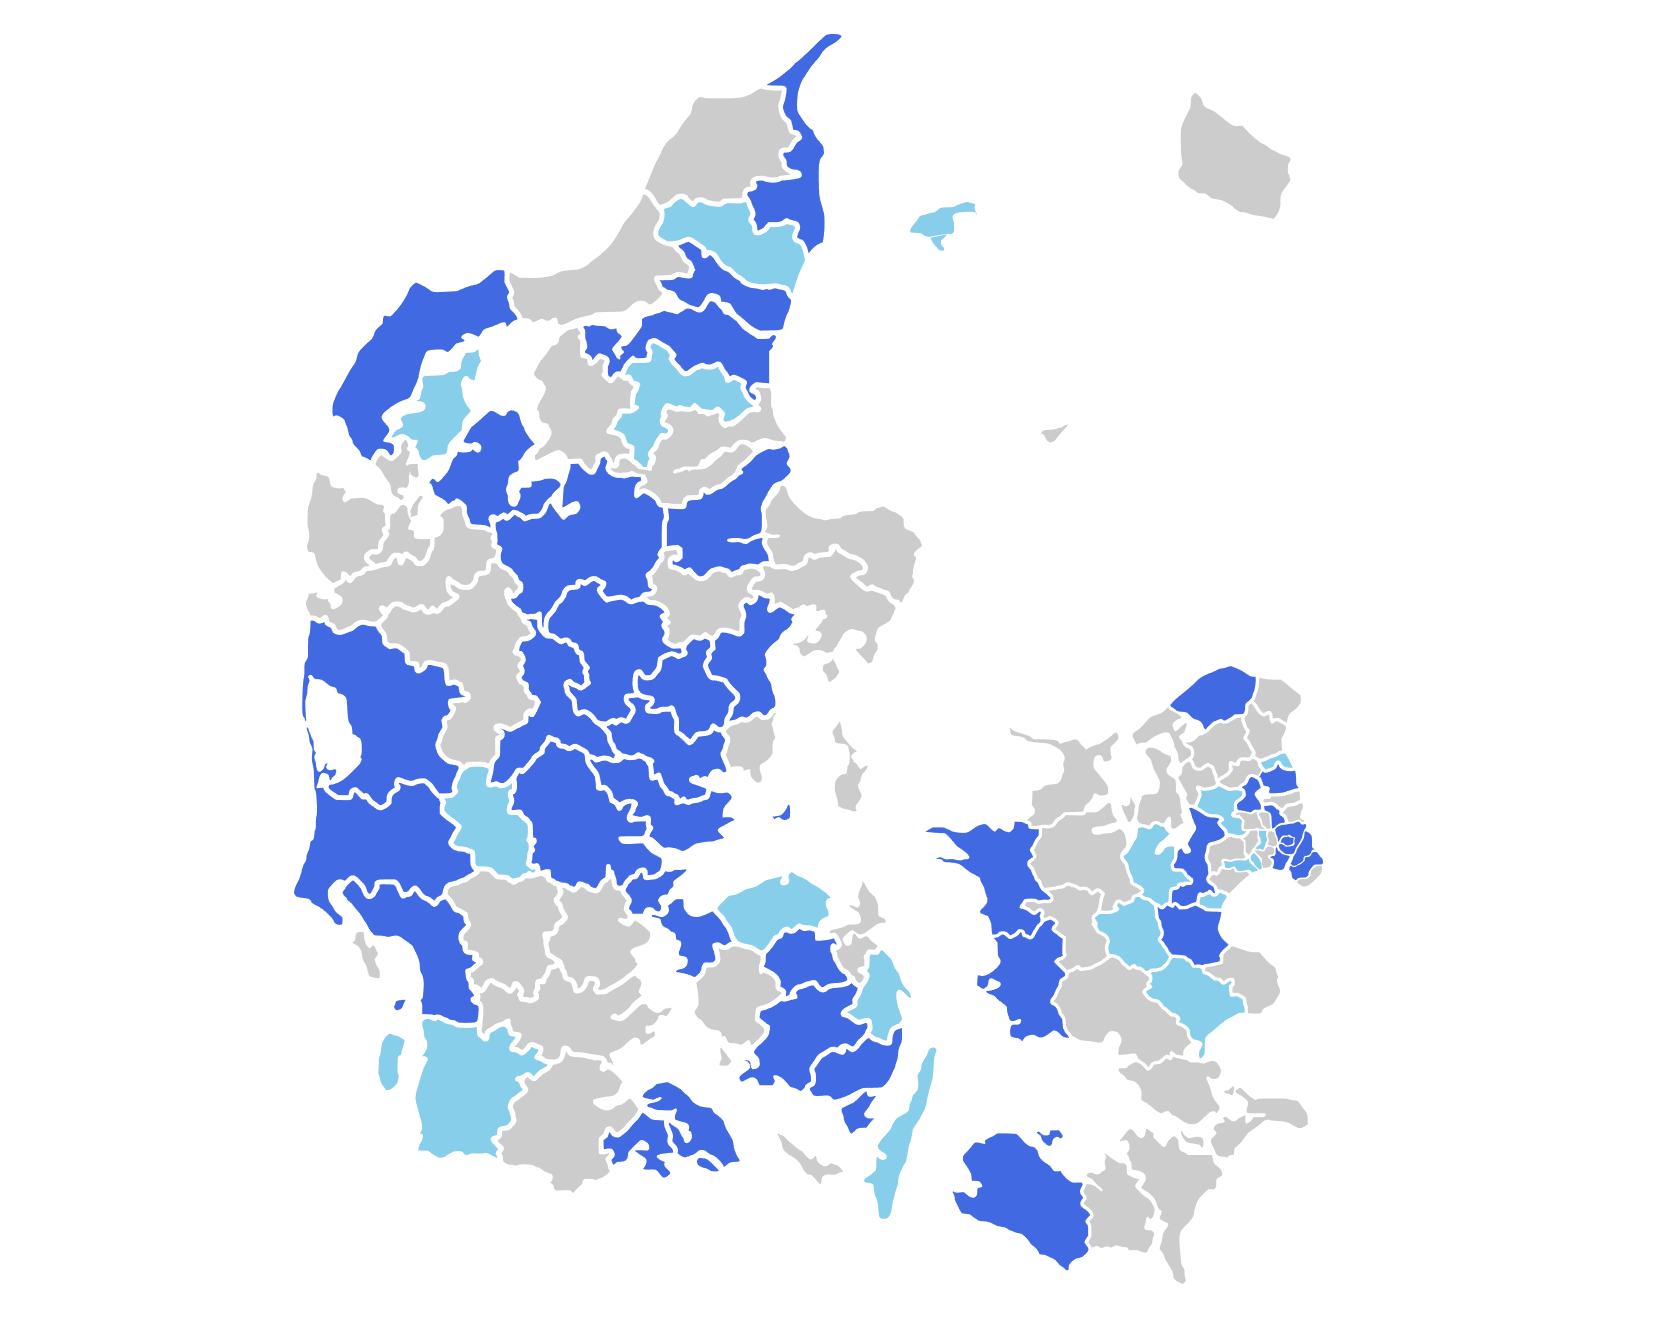
- Customize the colors of each area (i.e. municipality, region, island or the full map of Denmark), e.g. to display relevant data in each municipality.
- Customize a tooltip that appears when hovering over an area.
As such, you can, without much hassle, have a map of Denmark that e.g. displays the population of each municipality where the higher the population, the darker the shade is. You can see such an example in the demo.
If you're interested in knowing more about the library and want to read the documentation, you can do so on Github or on NPM. The next few sections will focus primarily on the process of developing the library.
react-denmark-map is also my first library ever.
Motivation
Overall, I think building, publishing and maintaining a library is a great way to learn and improve your skills as a developer. This belief was what led me to create react-denmark-map.
In relation to creating React libraries, one of the things you have to get used to is using a build tool like Webpack or Rollup. This was something that I had to learn since frameworks like CRA or Next.js abstracts away the need to manually configure a build tool. I used Rollup for this project, and it's a module bundler that compiles your code into a single file.
Practicing my Javascript and Typescript skills was another motivation for creating react-denmark-map. Among other learnings, react-denmark-map required using more generic types which was a good Typescript learning experience. In addition to Typescript, another measure I used to ensure the quality of the library was to write unit tests. I used Jest and React Testing Library and wrote tests after implementing a feature to practice test-driven development.
An important aspect of developing a library is writing documentation. I wrote documentation using Markdown and followed common conventions used in similar libraries. As previously mentioned, the documentation is available on Github or NPM. Lastly, I had to learn to publish to NPM and subsequently also how to version each iteration of the library with semantic versioning (major, minor, bug fix).
In summary, the motivations for starting the project were to:
- use a build tool like Rollup.
- practice my Javascript and Typescript skills.
- improve my ability in writing tests.
- write documentation.
- publish to NPM and use semantic versioning.
Organizing the project
As with many of my other projects, I used a kanban board to organize my work. Initially, I created tickets for each feature I wanted to implement and gradually moved them to the "in progress" column and finally to the "done" column. I still use it to organize and prioritize bugs and new features on the library.
The process
To give you an idea of how I went about developing the library so you can understand the challenges I faced, I'll first outline the steps I took to get from an empty repository to a published library.
The first thing I did was I found an SVG of Denmark with the municipalities of Denmark which I then modified (this turned out to be one of the most challenging steps, more on that later). After configuring the repository with Typescript, Rollup, Babel and Storybook, I started adding features to the React component containing the SVG of the municipalities of Denmark, i.e. the props onClick, onHover, color, customizeMunicipalities, customTooltip.
Realizing that I had to add support for more areas, such as the regions of Denmark, I abstracted the code for the municipalities into a more generic component. This component was then used to create the components for the regions of Denmark, the islands of Denmark and the full map of Denmark. At this point, the generic component is generic enough to create maps of other countries or areas with the same features as the map of Denmark without much effort.
Currently, after finishing the version 1.0, the folder structure looks like this:
src
├── components
│   ├── areas
│   │   ├── denmark
│   │   │   ├── ...
│   │   ├── islands
│   │   ├── municipalities
│   │   ├── regions
│   ├── map
│   │   ├── Map.test.tsx
│   │   ├── Map.tsx
│   │   ├── Tooltip.tsx
│   ├── index.ts
├── index.ts
├── styles.css
The map directory stores the generic map component and the Tooltip component that's used in the map component. The areas directory stores the component, the storybook file and the paths commands for the different areas of Denmark. For example, the municipalities directory contains the files data.ts, Municipalities.tsx, Municipalities.stories.tsx and index.ts.
Main challenges
Let's dive into the challenges I faced when developing version 1.0 of react-denmark-map. These were, among others:
- aquiring a suitable SVG of Denmark
- optimizing the component to avoid excessive rerenders
Aquiring a suitable SVG of Denmark
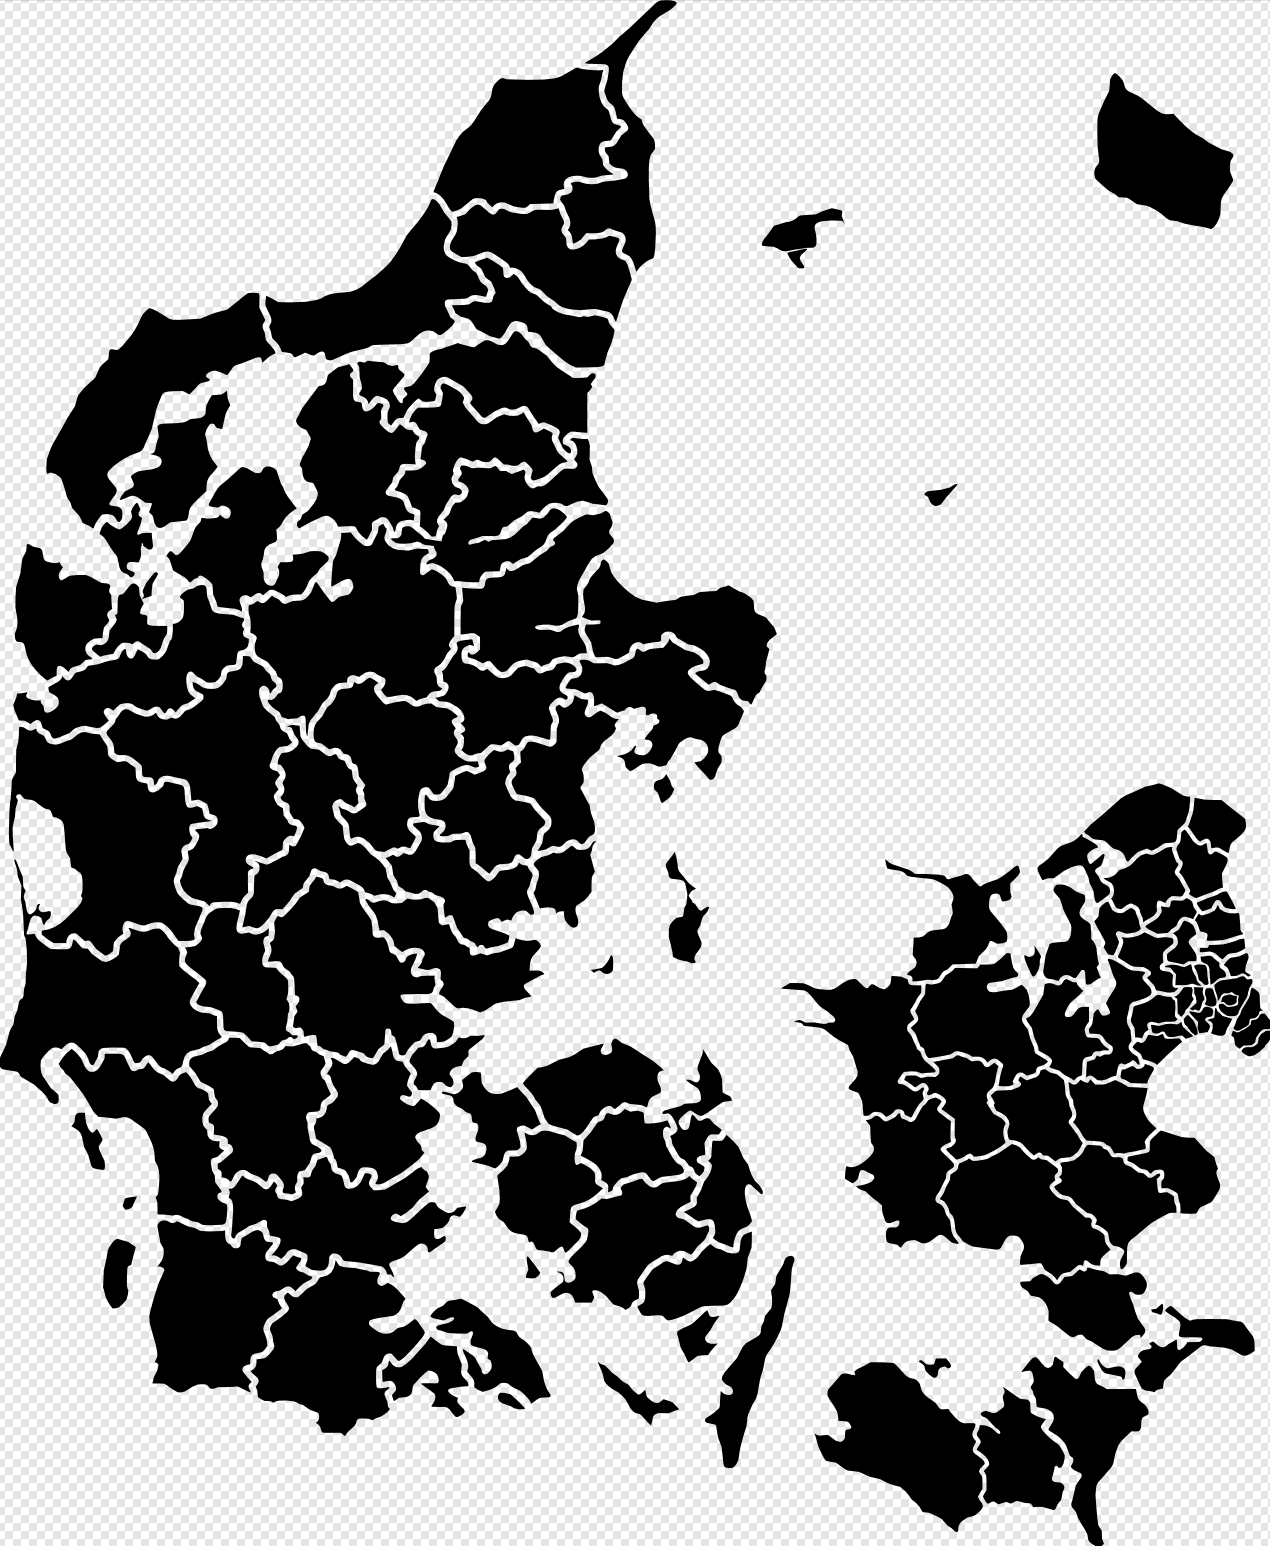
This step isn't related to developing the library as such. But as previously mentioned, finding SVG's of the different areas of Denmark turned out to be more difficult than anticipated. I decided to start off by creating the component for the municipalities so I looked for an SVG with the municipalities of Denmark. The SVG had to contain each municipality as a seperate path so that I could add interaction to each municipality, but no such SVG existed. Instead, I took the following steps to create the SVG:
- I downloaded a PNG of the municipalities of Denmark.
- I used a program called Inkscape to trace the edges of the PNG to create an SVG with roughly seperated municipalities.
- I merged the traced paths into each municipality precisely to create the final SVG using editing software (Affinity Designer, similar to Adobe Illustrator).
This may seem confusing but the result was a SVG with each municipality as a seperate path as seen on the image below.
To create the SVG for the regions of Denmark, I used a different approach. Since the regions each contain a set number of municipalities, I could simply erase the borders and merge the municipalities in the region. I was able to use the same approach to create the SVG for the islands of Denmark. Creating the full map of Denmark simply meant merging all the paths in the SVG.
Optimizing the component
As a person coming from building relatively small apps using a framework, I haven't had to worry too much about performance. But since react-denmark-map is a library, I had to make sure that anyone using the library wouldn't experience performance issues from using it.
One of the main performance problems was with the tooltip. To tooltip is displayed near the cursor when the user is hovering an area. To illustrate the particular problem I faced, take a look at the Map component below.
export default function Map(props) {
  const [tooltipStyle, setTooltipStyle] = useState({
    position: 'fixed',
    top: 0,
    left: 0
  })

  // updates the position of the tooltip when the user hovers an area
  const handleMouseMove = (event) => {
    setTooltipStyle((prevState) => ({
      ...prevState,
      top: event.pageY - 35,
      left: event.pageX + 20
    }))
  }

  return (
    <figure>
      <div id="react-denmark-map-tooltip" style={tooltipStyle}>
        {/* Tooltip content... */}
      </div>
      <svg>
        {props.areas.map((area) => (
          <path key={area.id} onMouseMove={handleMouseMove} />
        ))}
      </svg>
    </figure>
  )
}
The code above updates the state tooltipStyle everytime the mouse moves within one of the areas. This causes the component to rerender, thus rerendering the props.areas.map method on every move of the mouse. There were several ways to solve this problem:
- Use the
useRefhook to store the reference to the tooltip element and then update the style of the element usingtooltipRef.current.style. - Create a seperate component for the tooltip and update the position of the tooltip by forwarding the ref to the
Mapcomponent, and then use theuseImperativeHandlehook to call a function inside the tooltip component that updates the position of the mouse.
I chose the latter to fully encapsulate the tooltip in a seperate component. You could also have encapsulated the tooltip into it's own component and controlled the position from the Map component, but this made the most sense because the Map component was becoming large and complex. After the change, the Map component looked like this:
export default function Map(props) {
  const tooltipRef = useRef()

  const { current } = tooltipRef

  return (
    <figure>
      <Tooltip ref={tooltipRef}>
      <svg>
        {props.areas.map((area) => (
          <path
            key={area.id}
            onMouseMove={(event) => current.handleMouseMove(event)}
          />
        ))}
      </svg>
    </figure>
  )
}
And the tooltip component:
function Tooltip(props, ref) {
  const [tooltipStyle, setTooltipStyle] = useState({
    position: 'fixed',
    top: 0,
    left: 0
  })

  useImperativeHandle(ref, () => ({
    handleMouseMove
  }))

  const handleMouseMove = (event) => {
    setTooltipStyle((prevState) => ({
      ...prevState,
      top: event.pageY - 35,
      left: event.pageX + 20
    }))
  }

  return (
    <div id="react-denmark-map-tooltip-wrapper" style={tooltipStyle}>
      {/* Tooltip content... */}
    </div>
  )
}

export default forwardRef(Tooltip)
As you can see, the tooltip is now nicely encapsulated and even the function for updating the position of the mouse is inside of the Tooltip component. More importantly though, the Map component no longer rerenders everytime the mouse moves - only the tooltip does. Functions for handling when the mouse enters and leaves an area were added shortly after which resulted in it becoming quite long, so encapsulating it in this way meant that the Map didn't become too long and complex.
I omitted Typescript and parts of the code for brevity but you can find the finished code for the map component here and the tooltip component here.
The future of the library
I will continue to maintain the library by fixing bugs and adding new features. I've already identified a bug that I will fix in the next release. I also want to add onMouseEnter and onMouseLeave props to the component since this will give the developer more flexibility. However, this is a relatively small library so it's limited how many improvements can be made to it. (Update: onMouseEnter and onMouseLeave props were added in v1.1).
Learnings I can use in the future
Learning how to set up and develop and actual library has probably been the most useful skill I've developed from this project. This includes writing documentation, learning about semantic versioning, configuring build tools and more. In addition, I've continued to enhance my skills using Typescript and React, as well as writing unit tests.
If you feel that you can use the library, you can find documentation and installation instructions on NPM or Github.